Thursday, June 9, 2011

Woven Rag Rug

This is somthing that I am totaly going to make this summer for my dorm room. They are thick rugs that will look great and you can say you made

-chloe
Recycle your old bed sheet into a lovely woven rag rug.
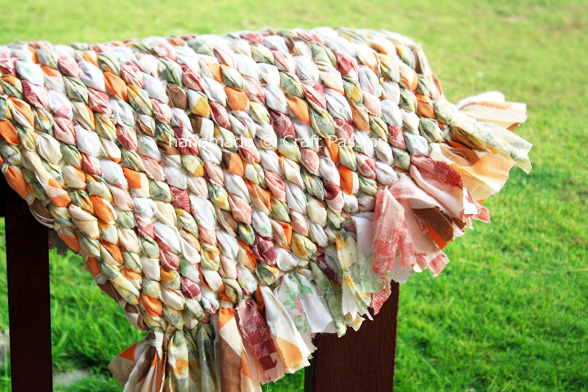
All you need to make this Woven Rag Rug are:
Material
1. Old bed sheets (3 king size flat sheets, more if you have fitted sheet)
2. Sturdy corrugated cardboard of your preference size (mine is 28 x 20″)
3. Tapestry needle or masking tape
5. Scissor
You might want to refer to the braided rag rug for some basic preparations for stripping and how to join the strips.
Mark the short side of the cardboard 1/2″ apart and 2″ down. Leave the edge for 2″ wide so that the cardboard is not being weakened.
Cut it to create slots for gripping the fabric strips.

Cut or tear the old sheets into 1″ or 2″ wide strips. Arrange 12 or 6 strips into each slot, leaving 6″ extra for each end.
Alternate the colors between the slots to create some color patterns for the woven rag rug. You will be surprised how it turns out.
Reserve some strips for the weaving.

Take a strip and slot it into the eye of a tapestry needle and start weaving.
If you don’t have a tapestry needle, you can tape a masking tape the end of the weaving strip, this will make it easier to go through the warp strips.
Secure the tail end in the first slot.
Being with pass through the weaving strip to the bottom of the first bunch, then on top for the second bunch, and bottom again for the 3rd bunch and so on….
Until you reach the last bunch, rotate the cardboard and continue weaving for the next row. If you end the weaving strip at the bottom of last bunch, then begin your second row with the top.

Since there are 12 strips in a slot, make sure you have all the strips weaved.
Pull the bunch vertically a little to straighten up the 12 strips as you go.
Repeat this until you complete the whole piece.

Weave the last row in opposite direction by creating a crisscross, pull the weaving strip and tie the warp strips in place.
Do the same on the other end of the rag. Join a new strip to sew and tie.

Hide the weaving strip in the warp strips by passing the strip within the weaves.
Take the completely weaved rag rug out from the cardboard by lifting all the strips from the slots.
Trim the end to the length of bout 4″ or to your preference.
~COMPLETE~

Tuesday, June 7, 2011

Bottle cap Candles

Here is a fun way to make little candles for summer. These little candles are quick and is a good way to use up all of your extra stuff. Light up your house with a couple bottle cap candles!

-Chloe
to make these colorful tiny candles, i used several materials that usually end up in a land fill:bottle capsbroken crayons, and empty soup cans. the only thing i bought to make them was the pre-waxed wicks which cost me $1.50 for a set of 12.
these make a great kid craft {with supervision, of course!} and would add a fun element to a wedding, romantic dinner, or even a fab conversation piece in your front room!
How to Make Bottle Cap Candles
supplies: bottle caps, crayons {or wax}, pre-waxed wicks, soup cans, wax paper {optional}, small cooking pan, scissors, and water
remove paper from crayons. you can also use candle wax if you wanted.
put crayons in clean, empty soup cans.
take your pre-waxed wicks and…
bottle caps
put wicks inside the bottle caps. i placed my bottle caps on wax paper in case i spilled some wax.
then using a small cooking pan filled with a couple inches of boiling water, place the can in the pan and melt the crayons. {you could also use a candle warmer to do this}the crayons melt pretty quickly. *note: it only takes a few crayons to fill a bottle cap!
pour the melted crayons or wax into the bottle caps.
let cool for 1-2 hours. then trim the wicks and you have some fun tea light candles to enjoy!
happy crafting!

Whirl-it Lampshade

This a easy and fun way to make a chandelier. It is also very cool looking for anywhere in your house or apartment! 

-Chloe
We really needed a new lamp, and we´ve planned to make one for months. This week we finally got around to it. It takes a bit of different materials, but it´s really easy when you´ve started. We recommend making it outdoors, as it gets quite messy. The result is pretty neat, especially at night when the threads cast shadow on the walls.
We planned to make the lamp using the yarn Garnstudio Ice, but it ran out really quickly, and we had to improvise by using a thinner yarn to complete it. Perhaps it happened for a reason - we really like the contrasts between the yarnquality and colours. Happy whirling!

What we used
One big, round balloon. We used really big one, but didn´t fill it completely. (You can get them from balloon-companies where you live, try Google...)
A pump to fill the balloon with
2 balls of Ice og 1 ball Lerke, or other yarn, preferably cotton or acryllic.
Vaseline
Water resistant marker
Wallpaper glue
An old box to mix the glue and the yarn in
Stick to mix the glue and the yarn
Gloves, if you don´t like it messy, we made it without...
Something to hang the lamp by. We used IKEAs ricelamp hanging device (bottom right), and cut the long bits off
Paper cloth
Wire with lightening bulb

How we did it
Gather all the materials.
Put the yarn into the glue and mix properly. Work the glue into the yarn without unveiling the ball.
Fill the balloon to a desireable size. Rub it in with a thin layer of vaseline.
Get your hanging device, and mark a circkle at the top of the balloon that´s 1 -2 cm smaller than the hanging device.
Hang it and start whirling.
Whild pretty tightly. Start oot vertically and work more and more horizontally. Make sure it get´s even. Make sure you stick to the circle you drew on top. Tuck the loose ends under the yarn at the top, and work the circkle when you´re done so it´s all even.
Leave it drying for 24 hours, we recommend that you take it inside to dry.
Pop the balloon and let there be light!
Neat?
Click here for more from Yarnbombing

Monday, June 6, 2011

Driftwood Hangers

This is a good way to have the perfect hangers for you house/apartment. They are easy to make and will look good.

-Chloe

∆DIY∆ Painted Driftwood Key Hook/Jewelry Organizer


Things you need for this DIY:
*driftwood
*acrylic paint
*hooks
*glue
*pliers
*a drill
*two screws
*keys/jewelry

Total time: 
1 hour

Total cost:
$3.00
(excluding items I already had; drill, screws, glue, etc.)


While I was in California for the holidays, I dragged Rubin and my best friend Rachel to Albany Beach. It's mainly used as a dog park so there were a lot of happy dogs running around having what looked like the most fun they'd ever had.


I was there for the driftwood. (With many projects in mind) 


I decided I wanted to paint a few of them to add a personal touch. I fell in love with this image of hand painted sticks by Ginette Lapalme, so I shamelessly copied them.


Here are my first few pieces. Driftwood is usually very porous so use as little water as possible, the paint should be the consistency of yogurt. I had to give it a few coats before it was opaque. The porousness also makes it dry fast so you can do this whole DIY in about an hour. 


My camera doesn't do great with low lighting so here is a shot with the flash.


These hooks are about $0.50 each at the hardware store.


Glue.


The wood was so soft I just screwed in the hooks by hand. If your wood is harder you may need to pre-drill your holes. I added a little wood glue to be sure they would stay in place.


It was really easy to get these in but I had to use pliers at the end for a few of them.


I spaced them an inch and a half apart, which gave me six hooks. 


I drilled a hole on each side and used a bigger bit to make a sink for the head of the screw.


And that's it. Since the whole thing (including keys) is so light I didn't bother with anchors. Obviously you can vary hook size and make a driftwood hook for something other than keys or jewelry but be wary of weight. Driftwood isn't usually a very strong material but that depends on the condition of the wood.


Enjoy!

Don't have time to ∆DIY∆? Buy it here.  


Friday, June 3, 2011

Banksy.

Banksy is a extremely talented graffiti artist from Bristol, UK. His artwork appears all over london and the world. He has never introduced him self to the media. He does not consider himself an artist, "Has been considered by some as talented in that respect; he uses his ordinal street art for, often in combination with distinctive stenciling technique, to promote alternative aspects of politics from those who promoted by the mainstream media." I think how he keeps his art skills a secret is why he is so interesting.
-Chloe 


Documentary of Banksy.

Monday, May 30, 2011

Rainbow Braid

This braid is really cool by Free People. They put colored hair extensions into the hair and it ends up working really well. Hope you like it.
-Chloe

Tuesday, May 10, 2011

Faux rabbit foot


I found this on the Freepeople blog. Hope you like it.
i’m sure you’ve all seen the foxtail trend that seemed to take over the blog world last summer… well in a spin on that trend, remember the phenomenon that was rabbits feet? i had a few of the so-called good luck charms when i was little.  but thanks to the crafty genius of halligan, you can make your own faux rabbit’s foot in just a few easy steps and have an adorable keychain or accessory to wear this summer!
finished_IMG1

Tools:
needle and thread
glue – such as E6000


Materials:
faux fur
beads
wire or looped head pins
bead caps
chain
embroidery thread
tin foil

Instructions:
Step 1: Download and print out template from our flickr page. Cut out your outline.
Photo1
Step 2: Trace paper template shape onto the back of two pieces of faux fur.
Photo2
Step 3: Cut out both shapes.
Photo3
Step 4: Place both fur sides together and do a simple blanket stitch around the outside, leaving about 1 1/4″ open for stuffing.
2
Step 5: Turn rabbit’s foot fur side out.  Then take your tin foil, roll it up and squeeze enough to fit vertically inside the pouch.  Then, use polyfill to fill any remaining open space.
Photo5
Step 6: Slightly curl lips of opening, line with glue, and pinch closed with a clothespin.
Photo6
Step 7: Trim extra fur from around tip of you rabbit’s foot form.
3
Step 8: Use embroidery thread to wrap tip of rabbits foot, tie off and glue string ends.
Photo8
Step 9: Sew 3 bead “toenails” onto base of rabbit’s foot.
Photo9
Step 10: Use a curled head pin or curl wire to form loop. Put loop through bead cap and put glue onto wire before inserting into top of rabbit’s foot.
Photo10
Step 11: String chain into loop.
finished_IMG2
All done! Use them as keychains, hang from your car’s rearview mirror as a good luck charm, or clip them to your bag or belt loops for a super cute accessory :)
finished_IMG3
images by the talented jess roberts, and be sure to check out halligan’s websitehere. thank you so much ladies!
top two images via fashiontoast and minkpink.

Friday, May 6, 2011

Dream Catcher

I found this on the Freepeople blog.

if you love dreamcatchers as much as i do, you must check out the work of rachael rice. she’s a very talented artist who makes dream catchers that are beyond anything i’ve ever seen. and that’s just one thing she makes – she is extremely creative and was kind enough to share some of her projects and how she makes them for our blog!
r1
r2
once you have the basic steps down for making a dreamcatcher, it becomes much easier to experiment and get a little crazy with them! here, rachael demonstrates how to make small ones using bangles and string – these would be adorable for key chains, bag charms and hanging in your car!
5678574574_f5b0e2a343_b
r3
r4
r5
r12
once this part is complete, attach feathers or any other embellishments using string!
r7
rachael has also been making more conceptual dream catchers using pieces of cardboard or thick paper, vintage doilies and hand-made paper feathers!
“Doily is a funny word. What I love about them is that they’re like lace mandalas, and whenever I hold one I think that some woman’s hands probably created it. I like collecting them, and you can find them for next to nothing at yard sales and antique shops.
Pieces of cardstock, cardboard, or even stiff paper can be a home for a lost doily reincarnated as a dream catcher.  Paint or collage on your disc (I used silver) and glue your doily on top!”